Free Paleo Diet Recipes!

Enter your Email


Paleo In A Kitchen

Chocolate Dipped Strawberry Macaroons

There’s a great company out there called Hail Merry that makes amazingly delicious gluten-free, grain-free, dairy-free, and refined sugar-free treats like macaroons and mini-tarts. And let me tell you, they are wondrous! They’ve inspired me to create my own versions. I took one bite of their strawberry macaroons and knew that I had to learn to make my own, as I didn’t want to leverage the house to buy the quantity I wanted to consume. While Hail Merry’s version is hard to beat, my version gets the cravings taken care of in the comfort of my own, unleveraged home.

Chocolate Dipped Strawberry Macaroons

COOKIE INGREDIENTS
  • 1 bag (1.2 ounces) freeze-dried strawberries
  • 5 egg whites
  • ⅛ tsp sea salt
  • ¼ cup honey
  • 2 tsp pure vanilla extract
  • 2 cups finely shredded coconut, unsweetened
  • 3 TBSP coconut flour, sifted
CHOCOLATE DIP INGREDIENTS
  • ¾ cup chopped dark chocolate
  • 1 tsp palm shortening
Makes 18 cookies

Serving Day:

  1. Preheat your oven to 350°F.
  2. In a food processor, purée half the bag of freeze-dried strawberries until it becomes a fine powder. Be sure to remove any moisture packet from the bag first! (I may have puréed the packet with the strawberries once. Maybe.)
  3. Coarsely chop the other half of the strawberries.
  4. In a medium-sized bowl, beat the egg whites with the sea salt with a hand mixer until stiff peaks form.
  5. Gently fold the strawberry powder, chopped strawberries, and remaining ingredients into the stiff egg whites just until combined. Don’t mix too vigorously, or you’ll lose the air in the egg whites.
  6. Scoop the dough into golf ball-sized balls, and place them on parchment-lined baking sheets.
  7. Bake the cookies for 13-15 minutes or until the bottoms turn golden brown.
  8. Place the baking sheet on a wire rack and let the cookies cool completely.
  9. Meanwhile, melt the dark chocolate and shortening in the top of a double boiler over simmering water, stirring until smooth.
  10. Dip the bottom of each cooled cookie into the melted chocolate. Place the cookies on a wax paper-lined baking sheet until the chocolate hardens.
  11. Store the cookies in an airtight container in the refrigerator, or freeze them until needed.
Get the best Paleo Recipe Book with much more recipes for your healthy living.

Chocolate Almond Butter Swirls

When you start eating Paleo, you think that you’ll never bake again, let alone make eye-catching treats because the ingredients, and therefore the doughs, are so different from traditional baking. But after playing with ingredients and dry-to-liquid ratios, you find that you can make plenty of beautiful desserts without wheat flour! These cookies are the perfect example, and a great blend of chocolate and almond butter swirled into a big soft cookie. The kids flip for these!

Chocolate Almond Butter Swirls

DRY INGREDIENTS
  • 1 cup almond flour
  • 2 TBSP coconut flour, sifted
  • 1∕3 cup arrowroot starch
  • ½ tsp baking soda
  • Pinch of sea salt
WET INGREDIENTS
  • 2 TBSP pure maple syrup
  • 1 egg
  • 2 tsp pure vanilla extract
  • ¼ cup almond butter
  • 2 TBSP coconut sugar (dry crystals)
  • 2 TBSP coconut oil, melted
ADD-INS
  • ½ cup mini chocolate chips
  • 2 TBSP cocoa powder
  • 2 tsp water
Makes 12 cookies

Serving Day:
  1. Preheat your oven to 350°F.
  2. In a small bowl, combine the almond flour, coconut flour, arrowroot starch, baking soda, and sea salt. Set the bowl aside.
  3. In a medium-sized bowl, blend the maple syrup, egg, vanilla extract, almond butter, coconut sugar, and coconut oil with a hand mixer until well combined and the coconut sugar has mostly dissolved.
  4. Add the contents of the small bowl to the medium-sized bowl, and mix well.
  5. Stir in the chocolate chips.
  6. Divide the dough in half, and place one half in another bowl.
  7. Add the cocoa powder and water to one half of the dough, and mix with your hands to incorporate.
  8. Shape 1-inch dough balls of both the plain dough and the chocolate dough. Take 1 ball of each, lightly press them together, and roll them in your palms to make them swirl.
  9. Place the cookies on a parchment-lined baking sheet.
  10. Bake for 10-12 minutes or until the bottoms are lightly browned. (I take mine out at 10 minutes because I like them a little doughy in the center.)
  11. Let the Swirls cool on wire racks.
  12. Store the Swirls in an airtight container, or freeze them until ready to eat.
Get the best Paleo Recipe Book with much more recipes for your healthy living.

Almond Shortbread

Shortbread is essentially flour and butter. That’s it! Yet, it’s amazing. Well, I used to think so before going Paleo. Nowadays, I make this version with heart-healthy coconut oil and almond flour, creating an amazingly decadent, melt-in-your-mouth shortbread that rivals the original. If you must have that buttery flavor and can tolerate dairy, you can sub 1/2 cup of softened butter for the coconut oil. You can also change this one with some chopped pecans or other flavors such as orange zest, cocoa powder, or cinnamon. What’s your favorite flavor?

Almond Shortbread

DRY INGREDIENTS
  • 1 cup almond flour
  • ¼ cup coconut flour, sifted
  • 2∕3 cup arrowroot starch
  • ½ tsp sea salt
  • ¼ cup coconut sugar
WET INGREDIENTS
  • ¼ cup pure maple syrup
  • ½ tsp pure almond extract
  • ¼ cup coconut oil, melted
ADD-IN
  • ½ cup coarsely chopped raw almonds
Makes 9 cookies

Serving Day:

  1. Preheat your oven to 350°F.
  2. In a small bowl, combine the almond flour, coconut flour, arrowroot starch, and sea salt.
  3. In a coffee grinder or food processor, grind the coconut sugar into a powder.
  4. In a medium-sized bowl, blend the powdered coconut sugar, maple syrup, and almond extract until combined.
  5. Add the contents of the small bowl to the medium-sized bowl, and mix to combine.
  6. Slowly add the coconut oil to the mixture, and blend well.
  7. Stir in the chopped almonds.
  8. Roll the dough between the 2 sheets of parchment paper to ½-inch-thickness.
  9. Using a circle cookie cutter, cut out 9 cookie shapes. If needed, remove any excess dough, re-roll it, and cut it out. If the dough is too sticky, dust the parchment paper with some extra arrowroot starch.
  10. Peel off the top piece of parchment paper. Place the bottom piece, with the cookies, directly on a baking sheet.
  11. Bake for 15-18 minutes or until the cookies are golden brown.
  12. Let the shortbread cool completely on a wire rack.
  13. Store in an airtight container or freeze until ready to eat.
Get the best Paleo Recipe Book with much more recipes for your healthy living.

Red Curry Steak Fajitas

Don’t let the name of this dish fool you. Red curry doesn’t taste anything like its yellow and green counterparts, so if you tend to shy away from anything called “curry,” you might want to give this one a try! Red curry paste can be very spicy depending on the brand, so experiment a little and find one that suits your taste. I use the Thai Kitchen brand, and I don’t find it spicy (as in hot), but almost smoky in flavor. Feel free to play with the levels of red curry paste and honey to get just the right balance for you!

Red Curry Steak Fajitas

CONTAINER #1 (SAUCE)
  • 1 TBSP red curry paste
  • ¼ cup olive oil
  • ¼ cup lime juice
  • 1 TBSP honey
  • 2 tsp coconut aminos
  • 1 small shallot, minced
  • 2 cloves garlic, minced
  • ½ tsp sea salt
  • Freshly ground black pepper to taste
CONTAINER #2
  • 2 pounds skirt steak (or your favorite cut), sliced
CONTAINER #3
  • 1 red or orange bell pepper, sliced
  • ½ yellow onion, sliced
CONTAINER #4
  • ¼ cup chopped, fresh cilantro
CONTAINER #5
  • 3 TBSP coconut oil
Serves 4
 
Prep Day:
  1. In a food processor, blend the sauce ingredients until smooth.
  2. Place the sauce in airtight container #1, and refrigerate until needed.
  3. Place the steak slices in airtight container #2, and refrigerate until needed.
  4. Place the sliced bell pepper and onion in airtight container #3, and refrigerate until needed.
  5. Place the cilantro and coconut oil in separate airtight containers (#4 and #5), and refrigerate the cilantro only.
Serving Day:
  1. In an electric skillet set to medium heat, heat the coconut oil.
  2. Add the bell pepper and onion, and cook, stirring occasionally, until softened, about 3 minutes.
  3. Add the steak, and cook, stirring occasionally, until the steak has browned, about 3 minutes.
  4. Add the red curry sauce, and stir. Simmer, uncovered, for 1-2 minutes or until the steak is done and the sauce is warm. Serve with a sprinkle of chopped cilantro on top.
Get the best Paleo Recipe Book with much more recipes for your healthy living.

Ribeye Nuggets with Jalapeño Pesto

So, how hot do you like it? I’m talking jalapeños here, so don’t let your mind wander! I like a little bit of spice, but not too much. So I remove both the seeds and the ribs from my jalapeños. The seeds contain most of the heat, but it’s also in those white ribs. The easiest way to prep your jalapeños is to cut off the stem end and split the pepper in half lengthwise. Using a small spoon, scrape out some (or a lot) of the ribs and seeds. Make sure to wash your hands afterward! The oils from the pepper can linger, which means that the next time you touch your nose or eyes … ouch!

Ribeye Nuggets with Jalapeño Pesto

CONTAINER #1
  • 4 ribeye steaks, cut into bite-sized pieces
CONTAINER #2
  • 2 TBSP coconut oil
CONTAINER #3 (PESTO)
  • ½ cup roasted, unsalted macadamia nuts
  • 1 cup packed fresh parsley
  • 1/3 cup packed cilantro leaves
  • 1 small shallot, minced
  • 2 cloves garlic, sliced
  • 2 jalapeños, cored, seeded, and chopped
  • 1 TBSP lime juice
  • ¾ cup olive oil
  • ½ tsp sea salt
  • ¼ tsp freshly ground black pepper
FOR SERVING DAY
  • Sea salt to taste
  • Freshly ground black pepper to taste
Serves 4
 
Prep Day:
  1. Place the steak pieces and coconut oil in separate airtight containers (#1 and #2).
  2. In a food processor, purée the pesto ingredients until smooth. Add more olive oil if needed to get the consistency you like.
  3. Spoon the pesto into airtight container #3.
  4. Store the containers in the refrigerator or a cooler until ready to use.
Serving Day:
  1. In an electric skillet set to medium-high heat, heat the coconut oil.
  2. When the oil is hot, add the steak pieces to the skillet. Season the steak with sea salt and pepper, and cook until it has browned on all sides but is still pink inside, about 5 minutes.
  3. Serve the steak with pesto drizzled on top.
Get the best Paleo Recipe Book with much more recipes for your healthy living.

Coffee Rubbed Steak Strips

The intoxicating smell and delicious taste of coffee is one of the miracles of this world. So, why limit its use to just that morning jolt? I’m a big fan of using coffee to enhance the chocolate flavor of a dessert or the savory goodness of an amazing steak. My family likes this dish on the sweeter side to offset the bitterness of the coffee, but adjust the amount of honey to suit your taste. And feel free to turn up the heat with additional chipotle powder or cayenne. Go ahead, live it up a little!

Coffee Rubbed Steak Strips

CONTAINER #1
  • 1½ tsp finely ground coffee
  • ¼ tsp chili powder
  • 1 tsp granulated onion
  • ½ tsp dry mustard
  • ¾ tsp paprika
  • ¾ tsp sea salt
  • Freshly ground black pepper to taste
  • 1½-2 pounds steak, cut into strips (I like top sirloin or New York strip)
  • 2 TBSP honey, slightly warmed if needed, for drizzling
  • 3 cloves garlic, minced
CONTAINER #2
  • 2 TBSP coconut oil
Serves 4
 
Prep Day:
  1. In a small bowl, mix the coffee, chili powder, granulated onion, mustard, paprika, sea salt, and pepper.
  2. In a 1-gallon zip-top bag, add the steak strips, honey, garlic, and spice mixture. Remove any air from the bag, and seal. Using your hands, squish the meat and spices around to coat all the pieces of meat.
  3. Store the bag in the refrigerator or a cooler until ready to use.
Serving Day:
  1. In an electric skillet set to medium-high heat, heat the coconut oil.
  2. Add the seasoned steak strips to the skillet, stir to coat them in the oil, and let them sit without touching so that they brown slightly, about 2 minutes.
  3. Cook, stirring occasionally, until the steak is browned but remains pink inside, about 3 more minutes.
Get the best Paleo Recipe Book with much more recipes for your healthy living.

Beef with Snow Peas

By changing the protein and/or the veggies, you can do just about anything with this recipe. Don’t like snow peas? Throw in some broccoli! Or how about a stir-fry with carrots, zucchini, and bok choy? Substitute chicken thighs or pork for the beef, and you can change the flavor every time you travel. Spending a few minutes to prep the sauce and slice the meat will give you a ten-minute meal in your hotel room that beats a small-town drive-thru any day of the week!

Beef with Snow Peas

CONTAINER #1 (SAUCE)
  • 1/3 cup coconut aminos
  • 1 TBSP fish sauce
  • 2 TBSP coconut vinegar (or raw apple cider vinegar)
  • 1 tsp sesame oil
  • 2 tsp minced fresh ginger
  • 2 cloves garlic, minced
  • ¼ cup water
  • 3 TBSP honey
  • ½ tsp red pepper flakes
  • 2 tsp arrowroot starch
CONTAINER #2
  • 1½-2 pounds sirloin steak
CONTAINER #3
  • 3 cups snow peas
GARNISH OPTIONS IN SEPARATE CONTAINERS
  • Chopped green onions
  • Sesame seeds
  • Red pepper flakes
FOR SERVING DAY
  • Coconut oil for the pan
Serves 4
 
Prep Day:
  1. In a jar with a tight-fitting lid (container #1), combine the sauce ingredients. Shake the jar vigorously until the ingredients are well mixed, and set the sauce aside.
  2. Slice the sirloin into thin strips, place them in a zip-top bag (container #2), and seal the bag.
  3. Wash and dry the snow peas, place them in a zip-top bag (container #3), and seal the bag.
  4. Place the jar of sauce, sirloin bag, and snow pea bag in a larger zip-top bag, and seal it.
  5. Place all the containers and bags in the refrigerator or a cooler until you’re ready to use them.
Serving Day:
  1. In a large electric skillet set to medium-high heat, heat the coconut oil.
  2. Add the sirloin to the skillet in an even layer.
  3. Do not stir the meat; just let it sit there and caramelize for about 4 minutes.
  4. Add the snow peas to the skillet, and stir to combine. Cook for 1 minute.
  5. Add the sauce to the skillet, and bring it to a boil. Reduce the heat, and simmer until the sauce has thickened, about 3 minutes.
Get the best Paleo Recipe Book with much more recipes for your healthy living.

Oregon Pork

I couldn’t resist a recipe salute to my home state of Oregon! The harmonious flavor combination of a nice Oregon Pinot Noir, toasted hazelnuts, and mushrooms is hard to beat. You can use any red wine you prefer, but a Willamette Valley Pinot Noir is a perfect addition to this dish and your wineglass. (Yes, I’m biased.) Food on the go never tasted so good!

Oregon Pork

CONTAINER #1
  • 4 boneless pork loin chops, cubed
CONTAINER #2
  • 1 leek, green part discarded, white end sliced in half, washed, then sliced into half-moons
  • 16 ounces white button mushrooms, sliced
CONTAINER #3 (SAUCE)
  • 2/3 cup Pinot Noir or red wine of your choice
  • ½ cup chicken broth
  • 1 tsp Dijon mustard
  • 1 small shallot, minced
  • 1 clove garlic, minced
CONTAINER #4
  • ½ cup toasted hazelnuts, coarsely chopped
FOR SERVING DAY
  • 2 TBSP coconut oil
  • Sea salt to taste
  • Freshly ground black pepper to taste
Serves 4
 
Prep Day:
  1. Place the pork in airtight container #1, and refrigerate it.
  2. Place the sliced leek and mushrooms in airtight container #2, and refrigerate it.
  3. Place the wine, chicken broth, mustard, shallot, and garlic for the sauce in a jar with a tight-fitting lid (container #3). Shake it to combine the ingredients, and refrigerate it.
  4. Place the hazelnuts in container #4, and set it aside.
Serving Day:
  1. In an electric skillet set to medium heat, heat the coconut oil.
  2. Sprinkle the pork with sea salt and pepper, and add it to the skillet. Stir to coat the pork with the oil, and cook until it has browned, about 2 minutes. Stir again.
  3. Add the leek and mushrooms. Cook, stirring occasionally, until they have softened, about 2 minutes.
  4. Shake the jar of sauce to combine. Pour the sauce into the skillet, and bring the liquid to a boil. Reduce the heat, and simmer, uncovered, for 4 minutes.
  5. Serve the pork with a sprinkle of hazelnuts.
Get the best Paleo Recipe Book with much more recipes for your healthy living.

Red Onion Balsamic Pork Bites

Oh, balsamic vinegar, how I love thee! You can make anything taste great with a little bit of that delicious liquid. Plus, it reduces easily, so you look like a pro in the kitchen. Just add aromatics like garlic and rosemary, simmer them in balsamic vinegar and a little bit of olive oil or ghee, reduce the liquid slightly, and you’ve got yourself a gourmet sauce for chicken, pork, or beef! Then, tell no one your secret; make them think that you slaved in the kitchen. It’s okay—your kitchen, your rules!

Red Onion Balsamic Pork Bites

CONTAINER #1
  • 2 TBSP coconut oil
CONTAINER #2
  • 1 large red onion, sliced very thin
CONTAINER #3
  • 1½-2 pounds thick boneless pork chops or pork loin, cut into cubes
CONTAINER #4 (SAUCE)
  • 1 cup balsamic vinegar
  • 2 TBSP olive oil
  • 3 cloves garlic, minced
  • 1 TBSP coconut aminos
  • ½ tsp oregano
FOR SERVING DAY
  • Sea salt to taste
  • Freshly ground black pepper to taste
Serves 4 

Prep Day:
  1. Place the coconut oil, onion, and pork in separate containers (#1, #2, and #3).
  2. In a jar with a tight-fitting lid (container #4), add the sauce ingredients, and shake to combine.
  3. Store the containers in the refrigerator or a cooler until ready to use.
Serving Day:
  1. In an electric skillet set to medium-high heat, heat the coconut oil.
  2. When the oil is hot, add the sliced onion. Toss to coat in the oil, and cook the onion for 2-3 minutes or until it starts to soften and brown slightly. Stir again, and cook for another 2-3 minutes.
  3. Move the onion slices into a pile in a corner of the skillet to stay warm and continue cooking as you add the pork to the skillet. Season the pork with sea salt and pepper, and brown it on all sides.
  4. Once the pork has browned, mix the onions into the pork.
  5. Shake the container of balsamic sauce to combine, and add it to the skillet, stirring up any delicious bits of goodness off the pan.
  6. Bring the liquid to a slight boil, reduce the heat, and simmer, uncovered, until the pork is done and the balsamic sauce has reduced and thickened slightly, about 5 minutes.
  7. Add more salt and pepper to taste, and serve.
Get the best Paleo Recipe Book with much more recipes for your healthy living.

Chili Lime Pork Medallions

This recipe is my personal favorite, not only because it cooks up in a jiffy in a single pan, but also because it looks and tastes like I put a lot of effort into it. Little does everyone know that it takes about 10 minutes to prep and another 5 or 6 minutes to cook! But no one needs to know the details, so let them ooh and ahh over your cooking talents. Then dig into these tangy pork medallions as you look relaxed and fabulous. Mum’s the word.

Chili Lime Pork Medallions

CONTAINER #1
  • 2-3 pounds pork tenderloin, sliced into ¾-inch-thick medallions
CONTAINER #2 (SAUCE)
  • 3 TBSP lime juice
  • Zest of 1 lime
  • ¼ cup olive oil
  • 1 TBSP honey
  • 1 tsp apple cider vinegar
  • 1 small shallot, minced
  • 2 cloves garlic, minced
  • ¼ cup packed fresh cilantro
  • ¾ tsp granulated onion
  • ¼ tsp chipotle chili powder
  • ½ tsp chili powder
  • ½ tsp sea salt
  • ¼ tsp freshly ground black pepper
FOR SERVING DAY
  • 2 TBSP coconut oil
  • Sea salt to taste
  • Freshly ground black pepper to taste
Serves 4
 
Prep Day:
  1. Place the pork medallions in a 1-gallon zip-top bag (container #1). Remove the air, and seal the bag. Refrigerate until needed.
  2. In a food processor, purée the sauce ingredients until blended and smooth.
  3. Place the sauce in an airtight container (#2), and refrigerate until needed.
Serving Day:
  1. Sprinkle sea salt and pepper into the bag with the pork medallions. Press the pork around in the bag with your hands to spread the salt and pepper.
  2. In an electric skillet set to medium heat, heat the coconut oil. Place the pork in the skillet, and cook for 1-2 minutes or until it has browned on one side. Turn the pork over, and cook for another 1-2 minutes until the other side has browned.
  3. Shake the sauce container to combine the ingredients. Pour the sauce into the skillet, and cook, stirring occasionally, until the pork is cooked through, about 4 minutes.
  4. Serve the pork with the sauce spooned over the top.
Tip:

We like to buy a bag of salad, olive oil, and lemons at a local grocery store. Squeeze some lemon slices over the salad, and add some olive oil, salt, and pepper. Pair it with the Chili Lime Pork Medallions, and you’ve got a filling, healthy meal in minutes!

Get the best Paleo Recipe Book with much more recipes for your healthy living.

Chicken Picatta Bites

One of the tricks of turning meals into make-ahead entrées is to look at your go-to dinners and see how you can make the process more user-friendly. These delectable Chicken Picatta Bites started out as full chicken breasts that were marinated, pan-roasted, blah, blah, blah. I loved the taste, but not the extra work. So I revamped the recipe, pulling out the essential flavor elements while updating the process to make it one-pan-friendly and super-quick. You’re welcome!

Chicken Picatta Bites

CONTAINER #1
  • 4 boneless, skinless chicken breasts, cut into cubes
CONTAINER #2
  • 2 cups artichoke hearts (in water or frozen, squeeze out the excess water)
CONTAINER #3
  • 1/3 cup chopped fresh parsley
CONTAINER #4 (SAUCE)
  • ½ cup lemon juice
  • 1/3 cup white wine
  • 1 cup chicken broth
  • 2 cloves garlic, minced
  • 2 TBSP capers
FOR SERVING DAY
  • 2 TBSP coconut oil
  • Sea salt to taste
  • Freshly ground black pepper to taste
Serves 4
 
Prep Day:
  1. Place the chicken, artichoke hearts, and parsley in separate containers (#1, #2, and #3).
  2. In a jar with a tight-fitting lid (container #4), combine the lemon juice, white wine, chicken broth, garlic, and capers to make the sauce.
  3. Shake well.
  4. Store the containers in the refrigerator or a cooler until needed.
Serving Day:
  1. In an electric skillet set to medium-high heat, heat the coconut oil. Add the chicken, and season it with sea salt and pepper. Cook the chicken, stirring occasionally, until it has browned on all sides, about 5 minutes.
  2. Shake the sauce jar to combine the ingredients. Add the sauce to the skillet, and stir.
  3. Add the artichoke hearts to the skillet, and bring the mixture to a slight boil. Simmer, uncovered, for 5-7 minutes or until the chicken is cooked through.
  4. Serve the chicken bites with parsley sprinkled on top.
Get the best Paleo Recipe Book with much more recipes for your healthy living.

Chicken with Mushrooms and Balsamic Cream Sauce

So tasty! So quick to prepare! You can even make this dish at home for a quick weeknight meal that your family will think you spent the whole day preparing! Yay for innocently deceiving your family! We also love to bring this dish along when we go camping; it’s like having an elegant restaurant meal in the comfort of the woods! It’s so good that I can’t stop using exclamation marks! Enjoy!

Chicken with Mushrooms and Balsamic Cream Sauce

CONTAINER #1
  • 2½-3 pounds boneless, skinless chicken thighs, cubed
CONTAINER #2
  • 1 cup sliced white button mushrooms
  • 2 cloves garlic, minced
  • 2 tsp fresh thyme leaves
  • 1 small shallot, minced
CONTAINER #3 (SAUCE)
  • 1 cup chicken broth
  • ¼ cup balsamic vinegar
CONTAINER #4
  • 3 TBSP coconut milk
  • 1½ tsp arrowroot starch

CONTAINER #5
  • ¼ cup chopped fresh parsley
FOR SERVING DAY
  • 2 TBSP coconut oil
  • Sea salt to taste
  • Freshly ground black pepper to taste
Serves 4
 
Prep Day:
  1. Place the cubed chicken in an airtight container (#1), and refrigerate it.
  2. Place the mushrooms, garlic, thyme, and shallot in an airtight container (#2), and refrigerate it.
  3. Place the chicken broth and vinegar in an airtight container (#3), and refrigerate it.
  4. Place the coconut milk and arrowroot starch in an airtight container (#4), and refrigerate it.
  5. Place the parsley in an airtight container (#5), and refrigerate it.
Serving Day:
  1. In an electric skillet set to medium heat, heat the coconut oil.
  2. Season the chicken with sea salt and pepper, and add it to the skillet. Cook the chicken, stirring occasionally, until browned, 3-4 minutes.
  3. Add the mushroom mixture to the skillet, and stir to combine. Cook until the mushrooms are soft, about 3 minutes.
  4. Pour in the chicken broth and vinegar, and stir. Bring it to a boil, reduce the heat to low, and simmer, uncovered, for 2 minutes.
  5. Shake the coconut milk jar to combine the ingredients. Add the contents to the skillet, and stir. Simmer until the sauce thickens, about 1 minute.
  6. Serve the chicken with some chopped fresh parsley on top.
Get the best Paleo Recipe Book with much more recipes for your healthy living.

Cashew Lime Chicken

Sizzling, tangy lime chicken covered in roasted cashews and chopped cilantro? And all in one pan for easy clean-up? Yes, please! Once you taste this lively dish, you’ll make it at home and not just on vacation in your hotel room. The only thing missing is the takeout box!

Cashew Lime Chicken

CONTAINER #1
  • 2 pounds boneless, skinless chicken breasts or thighs, cut into thin strips
CONTAINER #2
  • 1 cup roasted, salted cashews
CONTAINER #3
  • ¼ cup chopped cilantro
CONTAINER #4 (SAUCE)
  • 1½ cups chicken broth
  • 1 TBSP fish sauce
  • ¼ cup coconut aminos
  • 1 TBSP lime juice
  • 1 tsp lime zest
  • 1 TBSP grated fresh ginger
  • 2 cloves garlic, minced
  • 2 tsp arrowroot starch
FOR SERVING DAY
  • 2 TBSP coconut oil
  • Sea salt to taste
  • Freshly ground black pepper to taste
Serves 4
 
Prep Day:
  1. Place the chicken, cashews, and cilantro in separate containers (#1, #2, and #3).
  2. In a jar with a tight-fitting lid (container #4), combine the chicken broth, fish sauce, coconut aminos, lime juice, lime zest, ginger, garlic, and arrowroot starch. Shake well.
  3. Place the jar and containers in the refrigerator or a cooler until needed.
Serving Day:
  1. In an electric skillet set to medium-high heat, heat the coconut oil.
  2. Add the chicken to the skillet, season with sea salt and pepper, and cook, stirring occasionally, until the chicken has browned, about 5 minutes.
  3. Shake the sauce jar again to combine the ingredients. Add the sauce to the skillet, stir, and bring it to a slight boil.
  4. Simmer, uncovered, for 5 minutes or until the chicken is cooked through and the sauce has thickened slightly. Serve with a sprinkle of cashews and chopped cilantro.
Get the best Paleo Recipe Book with much more recipes for your healthy living.

Lemon Sage Turkey Tenders

If you’re the type who never buys fresh herbs, I beg you to reconsider! Fresh herbs have a flavor impact that far surpasses dried. There’s really no comparison. I never thought much of either thyme or sage until I tried them fresh. All I can say is WOW! A sprinkle of dried sage on these turkey tenders would be “meh.” But a few fresh leaves here and there turn this dish into something spectacular. Give it a try; I know you’ll love it!

Lemon Sage Turkey Tenders

CONTAINER #1 (SAUCE)
  • ¼ cup lemon juice
  • ¼ cup olive oil
  • 2 TBSP white wine
  • ½ cup chicken broth
  • ½ tsp sea salt
  • Freshly ground black pepper to taste
CONTAINER #2
  • 1½ pounds turkey tenders
CONTAINER #3
  • 2 TBSP arrowroot starch
CONTAINER #4
  • 3 TBSP coconut oil
CONTAINER #5
  • Fresh sage leaves
Serves 4

Prep Day:
  1. In airtight container #1, combine the lemon juice, olive oil, white wine, chicken broth, sea salt, and pepper until combined. Refrigerate until needed.
  2. Place the turkey tenders in a zip-top bag, remove the air, and seal the bag.
  3. Pound the tenders with a kitchen mallet until ½-inch-thick.
  4. Remove the tenders from the bag, and cut them in half lengthwise. Remove the tendon that runs along the center of each one.
  5. Place the tenders in airtight container #2, and refrigerate until needed.
  6. Place the arrowroot starch in a 1-gallon zip-top bag (container #3) and seal.
  7. Place the coconut oil in airtight container #4.
  8. Place the sage leaves in a small container (#5), and refrigerate until needed.
Serving Day:
  1. Place the tenders in the bag of arrowroot starch, seal, and toss them around to coat them.
  2. In an electric skillet set to medium heat, heat the coconut oil. Add the tenders, and cook for 2 minutes to brown. Once browned, flip them over to brown the other side.
  3. Shake the sauce container to combine the ingredients, and pour the sauce into the skillet.
  4. Place the sage leaves on and around the turkey tenders and simmer, uncovered, until the turkey is cooked through, 3-4 minutes.
Get the best Paleo Recipe Book with much more recipes for your healthy living.

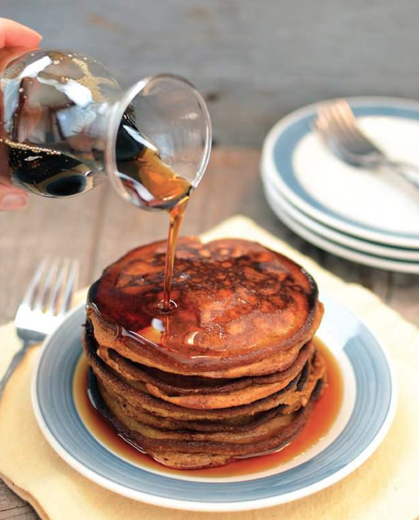
Pumpkin Cardamom Pancakes

Why should the nasty prepackaged foods get all the convenience? Even Paleo pancakes can be premixed in a jar with a tight-fitting lid, making for easy pancake cookin’ in your hotel room! Make sure to use a larger jar than you think you need, as this batter will thicken quite a bit after sitting in a cooler, and you’ll need to add more water before cooking. Start with a small amount of water and add more if needed. Remember, you can always add more, but you can’t remove it once it’s in there! If it gets too runny, well, it still makes a nice crepe-like pancake.

Pumpkin Cardamom Pancakes

CONTAINER #1
  • ¼ cup almond flour
  • ¼ cup coconut flour, sifted
  • 2 TBSP arrowroot starch
  • ½ tsp baking soda
  • 1 tsp cinnamon
  • 2 tsp ground cardamom
  • Pinch of sea salt
  • ½ cup pumpkin puree (canned or boxed)
  • 5 eggs
  • ½ tsp pure vanilla extract
  • 2 TBSP pure maple syrup
  • ¼ cup coconut milk
CONTAINER #2
  • 3 TBSP coconut oil
CONTAINER #3
  • Maple syrup to top the pancakes
Makes 12 pancakes

Prep Day:
  1. In a medium-sized bowl, combine the almond flour, coconut flour, arrowroot starch, baking soda, cinnamon, cardamom, and sea salt.
  2. Add the pumpkin, eggs, vanilla extract, maple syrup, and coconut milk, and blend with a hand mixer until the ingredients are fully combined.
  3. Store the batter in a large jar with a tight-fitting lid in the refrigerator or a cooler until needed.
Serving Day:
  1. Add water to the jar of pancake batter a little at a time. Shake after each addition until the batter is the consistency of traditional pancake batter.
  2. In an electric skillet set to medium heat, heat 1 TBSP coconut oil.
  3. Pour the batter into the skillet to form 3- or 4-inch-wide pancakes.
  4. Cook the pancakes until they bubble in the middle and the edges are set. Flip and cook the other side a few minutes more.
  5. Repeat steps 2-4 with the remaining coconut oil and batter.
  6. Serve the pancakes with maple syrup.
Get the best Paleo Recipe Book with much more recipes for your healthy living.

Everything Skillet Scramble

I just love this “on the road” breakfast. Because my hubby can’t have eggs, I cook everything else first, spoon out some for him, and then add the eggs for the rest of us. It works like a charm! What makes this dish mess-free and easy is putting all the ingredients in mason jars.

They travel well in a cooler, and I don’t have to mess with cracking eggs in the hotel room—or accidentally in the cooler on the way! Did you know that when you crack eggs into a jar, they stay together? You can actually pour them out carefully one by one. I’ve used this trick while camping, cracking a dozen eggs into a jar and pouring out what I need each time for breakfast. Be careful, though! Rough travels will break the yolks and mix the eggs.

Everything Skillet Scramble

CONTAINER #1
  • 2 TBSP coconut oil
CONTAINER #2
  • 2 medium sweet potatoes, peeled and cubed
CONTAINER #3
  • 1 small yellow onion, diced
  • 1 large red or yellow bell pepper, chopped
CONTAINER #4
  • 1 pound sausage links, cut into bite-sized pieces (I like to use precooked Applegate Farms sausages when I travel, but at home, feel free to use your favorite uncooked links or bulk breakfast sausage)
CONTAINER #5
  • 1 cup spinach, chopped
CONTAINER #6
  • 8 eggs
FOR SERVING DAY
  • Sea salt to taste
  • Freshly ground black pepper to taste
Serves 4

Prep Day:
  1. In a small container with a tight-fitting lid (#1), place the coconut oil.
  2. In airtight container #2, place the cubed sweet potatoes.
  3. In airtight container #3, place the diced onions and chopped peppers.
  4. In airtight container #4, place the diced sausage.
  5. In airtight container #5, place the chopped spinach.
  6. Into airtight container #6, crack the eggs gently.
  7. Place the containers in the refrigerator or a cooler until needed.
Serving Day:
  1. In an electric skillet set to medium heat, heat the coconut oil.
  2. Add the sweet potatoes. Cook, stirring occasionally, until softened, about 5 minutes.
  3. Add the onions and peppers. Cook, stirring occasionally, for 4 minutes. Add more oil if needed, and watch the heat. Turn it down if the veggies cook too fast.
  4. Add the diced sausage to the skillet. Cover and cook for 5 minutes for precooked sausage or 10 minutes for uncooked sausage, stirring occasionally.
  5. When the sausage is cooked/heated through, add the chopped spinach, and stir. Cook for 1 minute.
  6. Add the eggs, and stir. Add sea salt and pepper to taste. Cook until the eggs are done, about 3 minutes, stirring occasionally, and serve.
Get the best Paleo Recipe Book with much more recipes for your healthy living.

Coffee Cup Eggs

This recipe isn’t new; it has been around as long as the microwave. But I’m always amazed at how many people don’t know about it or have no idea how to cook an egg in the microwave without it turning into jerky (which, by the way, is not good!).

This little breakfast has saved many a vacation for my family, providing a quick, inexpensive tummy filler before we leave the hotel room. Make sure you let your creative juices flow and bring along your favorite egg additions when you pack your cooler! Oh, and remember that microwave ovens vary, so keep an eye on your eggs and adjust the cooking time as needed.

Coffee Cup Eggs

EGG INGREDIENTS
  • 1 tsp coconut oil or ghee
  • 2 eggs per 12-ounce coffee cup (make sure it’s microwave safe)
  • Sea salt to taste
  • Freshly ground black pepper to taste
OPTIONAL ADD-INS
  • Chopped cooked bacon
  • Chopped chives
  • Chopped cooked ham
  • Shredded cheese
  • Chopped cooked mushrooms
Serves 1

Serving Day:

  1. In the coffee cup, heat the coconut oil or ghee in the microwave for about 10 seconds or until melted.
  2. Swirl the cup to coat the sides.
  3. Crack the eggs into the cup, and stir gently with a fork to scramble.
  4. Rinse your fork, and wipe it dry.
  5. Add sea salt and pepper to the eggs.
  6. Microwave the eggs on high for 50 seconds.
  7. Stir the eggs with the clean fork, and toss in any add-ins.
  8. Microwave the eggs for another 30-45 seconds or until set.
  9. Let the eggs cool for a minute before eating.
Get the best Paleo Recipe Book with much more recipes for your healthy living.

Br-Egg-Fast Hot Dogs

Sometimes, when you travel, you have to get creative with breakfast. With a celiac husband, my family can’t just pop into IHOP and order eggs and bacon, hold the pancakes. This is because most restaurants that serve breakfast mix their own pancakes and waffles, or even bake many of their own pastries. This means that flour is all over the place, making it unsafe for us. So we eat in our room when we travel, and this odd little combo has been a great go-to treat for my kiddos. Okay, I like it too! Just be sure to get good-quality, grass-fed, uncured hot dogs.

Br-Egg-Fast Hot Dogs

INGREDIENTS

  • 4 grass-fed hot dogs (such as Applegate Farms)
  • 1 TBSP coconut oil or ghee, divided
  • 4 eggs
Serves 4

Prep Day:
  1. Hot dogs are usually precooked, but I like to grill or sear them in a hot pan to get them browned and pretty. Then set them aside.
  2. Grease an 8-inch skillet with 1 tsp coconut oil or ghee. Heat it over medium heat.
  3. Meanwhile, in a small bowl, crack an egg, whisking to scramble.
  4. Add the whisked egg to the hot skillet. Swirl the pan gently to coat the entire bottom of the pan with the egg. Gently push the edges of the egg circle toward the center to allow some of the uncooked egg to spread to the outer edges.
  5. Once the egg is fairly set and only a small amount of uncooked egg is left, gently flip the egg over to cook the other side. This takes only a few seconds.
  6. Place the cooked egg circle on a wire rack to cool slightly.
  7. Repeat steps 2-6 for the other eggs.
  8. While the eggs are still slightly warm, wrap them around the hot dogs, including any additional fillings you’d like, such as spinach or mushrooms, and secure with toothpicks.
  9. Refrigerate the hot dogs to cool them completely. Store in the fridge or a cooler until ready to use.
Serving Day:
  1. To enjoy, simply reheat the hot dogs in the microwave in 20-second increments until heated through.
Get the best Paleo Recipe Book with much more recipes for your healthy living.

Shrimp Rolls with Nutty Ginger Sauce

Shrimp Rolls with Nutty Ginger Sauce

Shrimp Rolls with Nutty Ginger Sauce

ROLL INGREDIENTS
  • 8 spring roll skins
  • 4 green leaf lettuce leaves
  • 16 large cooked shrimp, tails removed
  • 1 small bunch cilantro
  • 1 carrot, cut into matchsticks
SAUCE INGREDIENTS
  • 1/3 cup almond butter
  • 2-3 TBSP coconut milk
  • ½ tsp minced fresh ginger
  • 1 TBSP lime juice
  • Pinch of red pepper flakes
  • 1 small clove garlic, finely minced
  • 1 TBSP coconut aminos
  • 1/2 tsp sesame oil
  • 1/2 tsp apple cider vinegar
Makes 4 rolls

Serving Day:
  1. In a shallow pan of lukewarm water, place 2 spring roll skins, and let them soak for 10-15 seconds to soften them slightly. Be careful when handling, as they break easily when brittle.
  2. Gently remove the skins from the water, and place them on a kitchen towel. Let them rest for about 30 seconds to become more pliable.
  3. Arrange 1 piece of lettuce on the bottom half of 1 skin. You can tear the leaf so it fits nicely. Leave a 1-inch border around the edge of the spring roll skin.
  4. Evenly distribute 4 shrimp, a little cilantro, and some carrots over the spring roll skin. Be sure not to overfill, which can cause the skin to break when rolling.
  5. Pressing down on the filling with your fingers, fold the left and right sides inward, and then start rolling the end nearest you over the top of the fillings and to the other side. If the skin gets too dry to seal, moisten the unsealed edges with a little warm water.
  6. Place the completed roll on a plate, seam side down, and cover with a damp paper towel. Repeat with the remaining ingredients.
  7. Shrimp rolls can be made a day ahead. Simply cover them with a damp paper towel, wrap them well in plastic wrap, and place them in an airtight container. Store in the refrigerator or a cooler until ready to use.
  8. In a medium-sized bowl, combine the sauce ingredients and whisk until fully combined.
  9. Store the sauce in a jar with a tight-fitting lid in the refrigerator until needed.
  10. To serve, cut the rolls on a diagonal, and serve them with the sauce.
Get the best Paleo Recipe Book with much more recipes for your healthy living.

Honey Mustard Dipping Sauce And Spicy Avocado Dipping Sauce

Honey Mustard Dipping Sauce

Honey Mustard Dipping Sauce

INGREDIENTS

  • 2 TBSP Dijon mustard
  • 2 TBSP yellow mustard
  • 3 TBSP honey
  • ½ tsp granulated onion
  • ¼ tsp granulated garlic
  • ¼ tsp sea salt
  • Pinch of freshly ground black pepper
Makes 1/3 cup

Serving Day:
  1. In a small bowl, stir together all the ingredients. Cover and refrigerate until needed.
Spicy Avocado Dipping Sauce

INGREDIENTS
  • 1 large ripe avocado, halved, pit discarded
  • 1 jalapeño, cored, seeded, and minced
  • 1 TBSP chopped fresh cilantro
  • 2 TBSP mayonnaise
  • 2 tsp lime juice
  • ½ tsp hot sauce
Makes 1 cup

Serving Day:
  1. Scoop the avocado flesh from the skins, and place it in a small bowl.
  2. Add the remaining ingredients and mash with a fork until fairly smooth and fully combined.
  3. Cover and refrigerate until needed.
Get the best Paleo Recipe Book with much more recipes for your healthy living.

Best Ever Chicken Strips

Best Ever Chicken Strips

Best Ever Chicken Strips

#1 PAN
  • ½ cup arrowroot starch
  • ½ tsp sea salt
  • ½ tsp freshly ground black pepper
#2 BOWL
  • 2 eggs
#3 PAN
  • ½ cup coconut flour, sifted
  • ½ tsp sea salt
  • ½ tsp freshly ground black pepper
  • ¾ tsp granulated onion
  • ½ tsp granulated garlic
  • ½ tsp paprika
  • ¼ tsp turmeric
CHICKEN
  • ¾ cup coconut oil (or tallow, lard, or duck fat)
  • 5 boneless, skinless chicken breasts, cut into 1-inch strips
Serves 4

Serving Day:

  1. Preheat your oven to 300°F.
  2. Place a metal cooling rack on a baking sheet, and set aside.
  3. In a shallow pan, place the #1 pan ingredients, and stir to combine.
  4. In a bowl (#2), whisk the eggs, and set aside.
  5. In a shallow pan, place the #3 pan ingredients. Stir to combine, and set aside.
  6. In a large skillet, heat the coconut oil over medium heat. You want enough oil to come halfway up the sides of the chicken strips.
  7. With a fork, pick up a chicken strip, and place it in the arrowroot mixture (#1 pan). Toss it to coat.
  8. Next, put the coated strip in the whisked eggs (#2 bowl), and turn it to coat.
  9. Move the strip to the coconut flour mixture (#3 pan), and turn it to coat.
  10. Place the strip in the skillet. Repeat steps 7-9 with the additional chicken strips until the pan is full but not crowded. The chicken strips should not touch each other.
  11. Cook the chicken on one side until it is browned, about 2 minutes. Then turn the strips, and continue cooking until the other side is nicely browned, about 2 minutes more.
  12. Place the browned chicken strips on the metal cooling rack on top of the baking sheet, and place the whole thing in the oven to cook while you fry the remaining strips.
  13. Continue to place browned strips on the rack until the last one is done. Leave the pan in the oven for an additional 8 minutes after adding the last strip.
  14. Remove the pan from the oven, and let the strips cool to room temperature, but for no longer than 1 hour.
  15. Place the chicken strips in an airtight container, separating the rows with wax paper. Refrigerate until needed. Serve with the Honey Mustard and Spicy Avocado dipping sauces.
Get the best Paleo Recipe Book with much more recipes for your healthy living.

Thai Chicken Drumsticks

You’d better make extras of these scrumptious drumsticks, because they go fast! Who knew picnic fare could be so flavorful? But they’re not just for your next road trip. We like these so much that they’ve become a staple weeknight meal at home. If you like things on the spicy side, add some red pepper flakes to the sauce for some kick.

Thai Chicken Drumsticks

INGREDIENTS

  • 3-5 pounds chicken legs, with skin
  • ½ cup loosely packed cilantro
  • 2 cloves garlic, sliced
  • 2 TBSP fish sauce
  • ¼ cup lime juice
  • ½-inch piece of fresh ginger, sliced
  • 1 small shallot, sliced
  • 2 TBSP olive oil
  • 2 TBSP coconut aminos
  • 1 TBSP honey
  • 2 TBSP coconut milk
Serves 4

Serving Day:
  1. Preheat your oven to 375°F. Grease a 9” x 13” baking dish. Distribute the chicken legs evenly in the dish.
  2. Place the rest of the ingredients in a food processor. Pulse until chopped. You should end up with a thick but slightly chunky sauce.
  3. Pour the sauce evenly over the chicken. Bake for 30 minutes.
  4. Remove the pan from the oven, flip the chicken, and spoon the sauce from the pan over each leg. Put the pan back in the oven and bake for another 30 minutes, or until chicken is browned and cooked through.
  5. Enjoy hot or cool slightly, or place in containers and refrigerate until needed.
Get the best Paleo Recipe Book with much more recipes for your healthy living.

BLAST Sushi (bacon, lettuce, avocado & sundried tomatoes)

We love making sushi at home, but I’m always a little concerned about taking it in a cooler, in case the temperature fluctuates more than that delicate crab meat will allow. I don’t know about you, but food poisoning on a road trip is something I try hard to avoid! So I came up with this little twist on the BLT to keep everything contained in a nice little wrap and still get my sushi-ish fix while on the road.

BLAST Sushi (bacon, lettuce, avocado & sundried tomatoes)

Per Sushi Roll/Log
  • 2 slices bacon
  • 4 slices avocado
  • 1 large romaine lettuce leaf
  • 1-2 TBSP julienne-cut sundried tomatoes
  • 1 sheet nori
Plus
  • Bamboo rolling mat to properly roll your sushi
  • Chopped black olives for garnish
Make what you need

Serving Day:
  1. Cook the bacon until done but not too crisp. Let cool.
  2. When the bacon is cool, slice it lengthwise into thin strips.
  3. Slice the romaine leaf in half, remove the center rib, and discard it.
  4. On the edge (closest to you) of the nori, place a half leaf of lettuce, a slice of bacon, a slice of avocado, some tomatoes, and the other half leaf of lettuce on top to cushion the bacon from poking through the nori. Roll tightly.
  5. Slice the roll with a very sharp knife and place in an airtight container. Refrigerate until needed.
  6. To enjoy, dip the sushi pieces in Paleo Ranch Dressing (recipe follows) and sprinkle a few chopped black olives on top.
Paleo Ranch Dressing
  • 1 cup mayonnaise
  • ¼-1/3 cup coconut milk (less for a thicker dressing, more for a thinner dressing)
  • Pinch of sea salt
  • Freshly ground black pepper to taste
  • ½ tsp finely minced garlic (about half a clove)
  • 2 TBSP chopped fresh dill
  • 3 TBSP chopped fresh parsley
  • 1 TBSP chopped fresh chives
Makes 1 1/4 cups

Serving Day:
  1. In a small bowl, whisk together all the ingredients. Try to make it the day before for best flavor, but a minimum of 1 hour in advance.
  2. To serve, dip the sushi rolls in the ranch dressing, and enjoy the heck out of it!
Get the best Paleo Recipe Book with much more recipes for your healthy living.

Chicken & Egg Salad Stuffed Peppers

Which came first—the chicken or the egg? I say, who cares! Let’s throw them both together and make something delicious. Whether on the road in a cooler or in a lunchbox for school, this healthy meal fills them up and keeps ‘em going. My kids adore this lunch on-the-go, especially the carrot spoons. I take an extra minute to scrape out a carrot stick so that they can use it as a spoon. That way, they can eat every bit of it, spoon and all! Hey, if it gets them to eat some extra veggies because it’s fun, it’s worth the extra time.

Chicken & Egg Salad Stuffed Peppers

SALAD
  • 2 cups diced cooked chicken
  • 2 hardboiled eggs, peeled and chopped
  • 1 stalk celery, chopped
  • 1 green onion, chopped
  • 1 TBSP chopped fresh parsley
  • ½ tsp dill
  • ½ tsp Dijon mustard
  • 2 TBSP mayonnaise
  • ⅛ tsp granulated onion
  • Sea salt to taste
  • Freshly ground black pepper to taste
  • Squeeze of lemon juice
SPOONS
  • 2 carrots, peeled
PEPPERS
  • 4 bell peppers, any color you’d like
GARNISH
  • Chopped toasted almonds
Makes 4 peppers

Serving Day:
  1. In a medium-sized bowl, stir together the salad ingredients until well blended. Set aside.
  2. Cut the ends off of the carrots. Cut off the skinny end, leaving a 4-inch piece on the fatter end. Cut this piece in half. Using a teaspoon, scrape out a well in the fattest part of the carrot to create a spoon. Do so for all 4 pieces.
  3. Cut the stem tops off of the bell peppers. With a spoon, scrape out the white ribs and seeds.
  4. Fill each pepper with the chicken and egg salad.
  5. Store the dish in an airtight container in the refrigerator or a cooler until ready to eat.
  6. Top each pepper with toasted almonds, and serve with a carrot spoon.
Get the best Paleo Recipe Book with much more recipes for your healthy living.

Tomato Salad with Jalapeño Vinaigrette

I love the versatility of a cherry tomato salad. By simply swapping the dressing with another favorite, you can create an entirely new dish with very little effort. And I’m all for very little effort in the kitchen! Try this one with the dressing from the Grilled Chicken Antipasto Salad on here for a satisfying change of pace.

Tomato Salad with Jalapeño Vinaigrette

SALAD INGREDIENTS
  • 2 pints (32 ounces) cherry tomatoes, sliced in half
  • 2 TBSP finely diced red onions
  • 2 TBSP chopped cilantro
DRESSING INGREDIENTS
  • 1 clove garlic, minced
  • 1 TBSP minced shallot
  • 1 small jalapeño, cored, seeded, and diced
  • 1 TBSP lime juice
  • 1 TBSP apple cider vinegar
  • ¼ cup olive oil
  • 1 TBSP honey
  • ¼ tsp chipotle chili powder
  • Pinch of sea salt
  • Freshly ground black pepper to taste
Serves 4

Serving Day:
  1. In a medium-sized bowl, combine the salad ingredients.
  2. In a food processor or bullet blender, combine the dressing ingredients. Process until all the ingredients are well blended, although some small chunks are fine.
  3. Pour the dressing over the salad, and toss to coat.
  4. Refrigerate the salad, or place it in a cooler until ready to eat.
  5. Stir the salad again before serving.
Get the best Paleo Recipe Book with much more recipes for your healthy living.

Grilled Chicken Antipasto Salad

My original antipasto salad recipe appeared in Paleo Indulgences and has been a family favorite for years. While we have enjoyed that particular version many times, I realized recently that it is more of a delicious side dish than a main meal when taken on the road. So I added grilled chicken, swapped the black olives for kalamatas, updated the dressing, and increased the measurements to feed a crowd. Now I have a one-bowl meal that travels well, and the whole family can enjoy it! Every once in a while, just to keep things interesting, I add chopped cooked bacon, pickled asparagus, mushrooms, or chopped raw cauliflower. This one’s best made the day before so that it soaks up the dressing and gets all yummified!

Grilled Chicken Antipasto Salad

SALAD INGREDIENTS
  • 1½ cups pitted kalamata olives
  • 2 cups artichoke hearts, frozen or in water (be sure to squeeze out any excess water with a paper towel)
  • 1 cup julienne-cut sundried tomatoes
  • 8 ounces salami, sliced into wedges
  • 1½ cups diced grilled chicken
  • 3 TBSP chopped fresh basil (about 8 leaves)
  • 3 TBSP chopped fresh parsley
DRESSING INGREDIENTS
  • 2/3 cup olive oil
  • 1/3 cup white wine
  • 2 TBSP minced shallot
  • 1 clove garlic, minced
  • 1½ tsp Dijon mustard
  • 1¼ tsp Italian seasoning
  • 1 tsp granulated garlic
  • 1 tsp honey
  • ½ tsp sea salt
  • Freshly ground black pepper to taste
Serves 4-6

Serving Day:
  1. In a large bowl, combine the salad ingredients. Set aside.
  2. In a jar with a tight-fitting lid, combine the dressing ingredients. Shake to mix well.
  3. Pour the dressing over the salad, and toss to coat.
  4. Cover the salad, and refrigerate it until needed.
  5. Stir the salad again before serving.
Get the best Paleo Recipe Book with much more recipes for your healthy living.

Citrus Red Onion Slaw with Grilled Chicken

Want to know a secret? I originally created this recipe with red cabbage. I had it all planned out, with the recipe jotted down. Then I went to prepare it one sunny afternoon, and bam! No red cabbage in the house. How did that happen? I was writing a book, for heaven’s sake. I shouldn’t make those mistakes! But I do. All. The. Time.

Why am I telling you about my incompetence? Well, because I want folks to understand that no one is perfect, and sometimes you just have to roll with the punches, be flexible, and think outside the recipe box. I had green cabbage on hand, knew it would taste great, and changed the name accordingly. Voilà! Citrus Red Onion Slaw! Don’t let small hurdles get in your way in the kitchen. Think of a fun way to come up with something new. Oh, and if you’d rather use red cabbage, feel free. It works!

Citrus Red Onion Slaw with Grilled Chicken

SALAD INGREDIENTS
  • 1 medium head green cabbage, thinly sliced
  • 1 small red onion, thinly sliced
  • 2 TBSP chopped fresh cilantro
  • ½ cup chopped celery
  • 2 cups cubed cooked chicken (I like to grill mine)
  • Sea salt to taste
  • Freshly ground black pepper to taste
  • ½ cup toasted walnuts
DRESSING INGREDIENTS
  • ½ cup orange juice
  • 2 TBSP lemon juice
  • 2 TBSP apple cider vinegar
  • ¼ cup olive oil
  • 1 tsp Dijon mustard
  • 2 tsp honey
  • 1 clove garlic, minced
  • ½ tsp sea salt
  • Freshly ground black pepper to taste
Serves 4

Serving Day:
  1. In a large bowl, combine the salad ingredients.
  2. In a jar with a tight-fitting lid, combine the dressing ingredients. Shake well, and pour it over the salad. Toss to coat.
  3. Store the salad in the refrigerator or a cooler until ready to eat.
Get the best Paleo Recipe Book with much more recipes for your healthy living.

Tomato Avocado Salad with Grilled Chicken

There is nothing better than summer-ripe tomatoes with a light vinaigrette to bring out their intense flavors! You can use your favorite tomatoes here, but I highly recommend splurging on some organic heirlooms. The colors and textures they bring to this salad can’t be beat. While my whole family enjoys this particular combo, you can vary the ingredients and change it up however you like. This salad would be great with steak instead of chicken and perhaps some mushrooms or bell peppers. Use the recipe as a jumping-off point to let your imagination fly!

Tomato Avocado Salad with Grilled Chicken

SALAD INGREDIENTS
  • 2½ cups cubed grilled chicken
  • 2 large heirloom tomatoes (or beefsteak)
  • 2 small avocados
  • 4 or 5 basil leaves, torn into smaller pieces
  • 1 cup black olives, sliced in half
  • ¼ cup diced red onion
DRESSING INGREDIENTS
  • ¼ cup olive oil
  • 1 TBSP lemon juice
  • 1 TBSP balsamic vinegar
  • 1 tsp Dijon mustard
  • 2 tsp coconut aminos
  • ½ tsp oregano
  • ¼ tsp tarragon
  • ½ tsp basil
  • ⅛ tsp sea salt
  • Pinch of freshly ground black pepper
Serves 4

Serving Day:
  1. Place the chicken in a large bowl with a lid.
  2. Cut the tomatoes in half, and then into thin wedges. Add them to the bowl with the chicken.
  3. Cut the avocados in half, and remove the pits. Slice the flesh lengthwise. Using a spoon, gently scoop out each avocado half. Separate the slices, and place them in the bowl with the tomatoes and chicken.
  4. Add the basil, olives, and onion to the bowl.
  5. In a jar with a tight-fitting lid, combine the dressing ingredients. Shake well, and pour the dressing over the salad. Use as much or as little as you’d like.
  6. Cover and refrigerate the salad until needed.
  7. Stir the salad before serving.
Get the best Paleo Recipe Book with much more recipes for your healthy living.

Steak & Chard Salad with Roasted Beets

For meals on the go, it doesn’t get any healthier or easier than this beautiful salad. Make everything a day ahead, and throw it together during your pit stop for a filling and nutritious lunch-a-go-go. Even my kiddos, who think they don’t like chard, annihilate this salad because it’s a salad, not chard. And who am I to argue with this logic?

Steak & Chard Salad with Roasted Beets

SALAD INGREDIENTS
  • 3 cups chopped chard leaves, thick stems removed
  • 1½ pounds ribeye or sirloin steak
  • Sea salt to taste
  • Freshly ground black pepper to taste
  • 2 large beets, peeled and sliced
  • Olive oil for drizzling
DRESSING INGREDIENTS
  • ½ cup olive oil
  • ¼ cup white wine vinegar
  • 1 shallot, minced
  • 1 clove garlic, minced
  • 1 tsp Dijon mustard
  • 1 tsp Italian seasoning
  • ½ tsp dill
  • 1 tsp granulated onion
  • ½ tsp sea salt
  • Freshly ground black pepper to taste
  • 1 tsp honey
Serving Day:
  1. Preheat your oven to 450°F, and heat your grill to medium-high heat.
  2. Place the chard in an airtight container, and place it in the refrigerator or a cooler.
  3. Season the steak with sea salt and pepper. Grill the steak to medium, about 4 minutes per side, depending on its thickness. Set it aside to cool.
  4. Line a baking sheet with parchment paper. Place the beet slices in a single layer on the baking sheet. Drizzle the beets with olive oil, and sprinkle them with sea salt and pepper.
  5. Roast the beets in the oven for 15-20 minutes or until soft. Then set them aside to cool.
  6. In a jar with a tight-fitting lid, combine the dressing ingredients. Shake to mix well. Store in the refrigerator or a cooler.
  7. Slice the steak into strips, place them in an airtight container, and store in the refrigerator or a cooler.
  8. Cut the beet slices in half, place them in an airtight container, and store them in the refrigerator or a cooler.
  9. When you’re ready to eat your salad, simply place the chopped chard in a bowl, and top it with the steak strips and beets. Drizzle on the dressing, and you’re all set!
Get the best Paleo Recipe Book with much more recipes for your healthy living.

Jicama Carrot Slaw with Grilled Steak

I made this slaw recently to take on a day trip with my family, and they ate it so quickly that I didn’t even get a bite! Good thing I packed other goodies, or I would have starved. (Well, we were 30 minutes from home, so I wouldn’t have starved. But I was getting really, really hungry, which is almost the same!) From what I hear, the tangy dressing soaks into the steak pieces, and when combined with the crunchy cabbage, carrots, and jicama . . . well, just make extra. Or so I’ve learned. You’ve been warned.

Jicama Carrot Slaw with Grilled Steak

STEAK
  • 2 pounds ribeye or sirloin steak, grilled to medium, cut into strips
SLAW INGREDIENTS
  • 2 cups shredded green cabbage
  • 1 cup julienned carrots
  • 1 cup julienned jicama
DRESSING INGREDIENTS
  • ¼ cup olive oil
  • 2 TBSP lime juice
  • 1 TBSP apple cider vinegar
  • 1 tsp Dijon mustard
  • 1 TBSP pure maple syrup
  • 2 tsp minced yellow onion
  • 1 tsp minced garlic
  • 1 TBSP minced fresh parsley
  • 1 tsp hot pepper sauce
  • ¼ tsp sea salt
  • Pinch of freshly ground black pepper
Serves 4

Prep Day:
  1. Store the steak strips in an airtight container in the refrigerator or a cooler until needed.
  2. In a glass bowl with a lid, combine the cabbage, carrots, and jicama. Refrigerate until needed.
  3. In a jar with a tight-fitting lid, combine the dressing ingredients. Shake until fully combined. Refrigerate until needed.
Serving Day:
  1. Shake the dressing ingredients to re-combine.
  2. Place the steak strips in the bowl with the veggies.
  3. Pour the dressing over the slaw and meat, and stir to combine. Enjoy it quickly before it’s all gone!
Get the best Paleo Recipe Book with much more recipes for your healthy living.

Creamy Cilantro No Potato Salad

First, a big thank you goes to Sarah Fragoso at Everyday Paleo for coming up with the original No Potato Salad made with cauliflower. Genius! Second, this recipe is another example of how I often mess up in the kitchen. One of the best parts of a good potato salad, for me, is the flavor of black olives throughout. And this one’s no exception. But wait!

Do you see any black olives in the photo? No? That’s because I forgot to add them to the bowl before taking a photo of the final dish! Yep, it happens all the time. So take my word for it, because I added the olives post-photo session, and the salad was fantastic. And third, while I don’t usually make my own mayo because I don’t use it often, I will make a batch for this recipe. The flavor of fresh homemade mayo is well worth the extra prep time.

Creamy Cilantro No Potato Salad

INGREDIENTS

  • 1 head cauliflower, cut into large florets
  • 4 eggs, boiled, peeled, and chopped
  • ½ cup diced dill pickle, or 1/3 cup dill pickle relish
  • 3 stalks celery, diced
  • 1 cup sliced black olives
  • ½ cup chopped fresh cilantro
  • ¼ cup diced red onion
  • 1 clove garlic, minced
  • ½ cup mayonnaise
  • 2 tsp Dijon mustard
  • 1 TBSP lime juice
  • ½ tsp sea salt
  • Freshly ground black pepper to taste
Serves a crowd!

Serving Day:
  1. Steam the cauliflower florets for 5-7 minutes. They should be tender but not too soft.
  2. Transfer the steamed florets to a medium-sized bowl, and refrigerate them until cool enough to handle, about 15 minutes.
  3. Meanwhile, in a large bowl, combine the eggs, pickle, celery, olives, cilantro, onion, garlic, mayo, mustard, lime juice, sea salt, and pepper.
  4. Remove the cooled cauliflower from the refrigerator, and chop it into bite-sized pieces. Add it to the rest of salad ingredients. Stir gently to combine.
  5. Taste the salad, and add more salt and pepper if needed.
  6. Store the salad in an airtight container in the refrigerator or a cooler until needed.
Tip:
  1. Add grilled shrimp, cooked bay shrimp, or diced chicken to the bowl, and make it a meal for the road!
Get the best Paleo Recipe Book with much more recipes for your healthy living.

Deviled Ham ‘n’ Eggs

I find it hard to believe now, but as a kid, I didn’t like deviled eggs. I would scoop out the filling and eat just the whites. There was something seriously wrong with me back then; I’m sure of it.

Nowadays, I can’t get enough of these one-bite flavor explosions! I constantly look for ways to enhance and vary the flavors without taking away from the original, deviled egg essence. I ran across the title of this recipe in a flyer at a local grocery store. I liked the idea of adding ham, so I ran with it.

The small addition of fresh thyme and parsley, combined with the smoky ham, is over-the-top fantastic!

Deviled Ham ‘n’ Eggs

EGGS
  • 6 eggs, boiled, peeled, and cooled
FILLING INGREDIENTS
  • 2-3 TBSP mayonnaise
  • 1 tsp Dijon mustard
  • ½ tsp lemon juice
  • ½ tsp chopped fresh thyme
  • 1 tsp chopped fresh parsley
  • ¼ tsp granulated onion
  • ¼ tsp granulated garlic
  • ½ tsp pure maple syrup
  • ¼ tsp sea salt
  • Freshly ground black pepper to taste
  • 1/3 cup finely diced cooked ham
GARNISH
  • 1 tsp chopped fresh thyme
Serving Day:
  1. Cut the eggs in half lengthwise. Remove the yolks, and place them in a small bowl. Set the whites aside on a plate.
  2. Mash the yolks with a fork.
  3. Add the mayo, mustard, lemon juice, thyme, parsley, granulated onion, granulated garlic, maple syrup, sea salt, and pepper to the mashed yolks, and stir to combine until creamy and smooth. If it’s too dry, add additional mayo as needed.
  4. Stir the ham into the egg mixture.
  5. Fill each egg white half with the ham filling.
  6. Top each deviled egg with chopped fresh thyme.
  7. Store the deviled eggs in an airtight container in the refrigerator or a cooler until ready to eat.
Get the best Paleo Recipe Book with much more recipes for your healthy living.

Sweet ‘n’ Smoky Deviled Eggs

If you’re tired of the same ol’ deviled eggs, this recipe will get you “egg-cited!” And best of all, you can customize the filling “egg-zactly” how you like. Prefer the flavor of mayo over avocado? You can use Paleo mayo instead, or a little bit of both. Like your filling super creamy? Add as much avocado or mayo as you want! I even like these “chick-a-dees” with a splash of my favorite hot sauce in the filling. Your creativity is your only limit, and that’s no “yolk!” Okay, I’m done now.

Sweet ‘n’ Smoky Deviled Eggs

EGGS
  • 6 eggs, boiled, peeled, and cooled
FILLING INGREDIENTS
  • ¼ cup julienne-cut sundried tomatoes
  • ⅛ tsp cumin
  • 3 strips bacon, chopped, cooked, but not too crispy (reserve some for garnish)
  • ¾ tsp smoked paprika
  • Sea salt to taste
  • Freshly ground black pepper to taste
  • 1/3 cup mashed ripe avocado
  • 2 TBSP olive oil
GARNISH
  • Chopped chives
  • Smoked paprika
Makes 12 eggs

Serving Day:
  1. Slice the eggs in half lengthwise. Gently remove the yolks, and place them in a food processor.
  2. Set the egg whites aside on a plate.
  3. Add the sundried tomatoes, cumin, bacon, paprika, sea salt, pepper, avocado, and olive oil to the food processor (reserve about 2 TBSP of the bacon crumbles for garnish). Pulse until fully combined and smooth. If you like an even creamier filling, you can add additional avocado or mayo until it reaches the desired consistency.
  4. With a spoon or piping bag with a decorative tip, fill the egg whites evenly.
  5. Sprinkle the eggs with chives, bacon crumbles, and a light sprinkle of smoked paprika.
  6. Keep the deviled eggs refrigerated or in a cooler until ready to eat.
Get the best Paleo Recipe Book with much more recipes for your healthy living.

Cashew Lime Hummus

I used to be a recipe addict. I would tear countless recipes from magazines and hold on to them for years in the hope that one day I’d make a delicious item that would become a family favorite forever.

Alas, I’ve grown up a bit since then, and I hate clutter. So I don’t tear out recipes anymore. However, I always encourage folks to adapt recipes (even mine) to fit their own needs and tastes. Just because the flavors work for my family doesn’t mean that they’re perfect for yours, so play! That said, I was cleaning out an old desk drawer and ran across a dip recipe that contained lime and coconut milk.

Those two were all I could salvage from the unhealthy ingredients list, but I was inspired to come up with this little creation that my kids love for dipping veggies.

Cashew Lime Hummus

INGREDIENTS

  • 1 cup roasted, salted cashews
  • ¼ cup coconut milk
  • 2 TBSP lime juice
  • 1 TBSP coconut aminos
  • 2 tsp minced shallot
  • Pinch of sea salt
  • Freshly ground black pepper to taste
Makes 11/2 cups

Serving Day:
  1. Place all the ingredients in a food processor, and purée until smooth. For a thinner dip, add a few additional tablespoons of coconut milk, one at a time, while blending to get the consistency you like.
  2. Store the hummus in an airtight container in the refrigerator until ready to use.
  3. Dip your favorite veggies, such as carrot sticks, celery sticks, or jicama spears.
Get the best Paleo Recipe Book with much more recipes for your healthy living.

Cracked Pepper and Chive Crackers

On road trips, we like to snack on crackers, salami, olives, etc. So I like to whip up some of these crunchy treats. We love the toasty onion flavor and the little bit of heat from the black pepper. These crispy crackers are perfect with guacamole too!

Cracked Pepper and Chive Crackers

CRACKERS
  • ½ cup almond flour
  • ¼ cup coconut flour, sifted
  • ½ tsp granulated onion
  • ¼ tsp sea salt
  • ¼ tsp coarsely ground black pepper
  • 1 egg
  • 1 TBSP coconut oil, melted
  • 3 TBSP chopped fresh chives
TOPS
  • ¼ tsp coarsely ground black pepper
Makes 30 crackers

Serving Day:
  1. Preheat your oven to 350°F.
  2. In a medium-sized bowl, whisk together the almond flour, coconut flour, granulated onion, sea salt, and pepper.
  3. Add the egg, and mix well with a hand mixer.
  4. Add the coconut oil and chives. Blend again until well incorporated. The dough will be crumbly but should stick together when squeezed in your hand.
  5. Roll the dough between 2 sheets of parchment paper. You will have to reshape the edges at times with your hands as it cracks. Roll into a small square, and remove the top piece of parchment.
  6. Sprinkle the tops with additional pepper, and press the pepper into the dough with your hands.
  7. Using a sharp knife, cut the dough into bite-sized pieces, and place them, while still on the parchment paper, on a baking sheet.
  8. Bake the crackers for 9 minutes.
  9. Remove the tray from the oven, and carefully pull the crackers apart with a spatula so that they bake more evenly. Bake for another 3-5 minutes or until the centers are cooked and the edges are golden.
  10. Let cool on wire racks, and store in an airtight container.
Get the best Paleo Recipe Book with much more recipes for your healthy living.

Nut-Free Granola Bars

Seeds are a great alternative to nuts, but they can get a little boring, according to my eight-year-old. She alternates between pumpkin and sunflower seeds, but she needs them jazzed up occasionally. The maple syrup and sunbutter in these heavenly bars give them an old-fashioned granola bar flavor with all the goodness of natural, real food ingredients and none of the preservatives. Omit the coconut if you can’t tolerate it; the recipe is still wonderful!

Nut-Free Granola Bars

INGREDIENTS

  • ¼ cup coconut oil
  • ¼ cup pure maple syrup
  • 2 TBSP coconut nectar
  • ¼ cup sunbutter (no sugar added, creamy)
  • 1 tsp pure vanilla extract
  • 1/3 cup raw pumpkin seeds
  • ½ cup roasted salted sunflower seeds
  • 1/3 cup raw sunflower seeds
  • 1 TBSP sesame seeds
  • ¼ cup mini chocolate chips
  • 1/3 cup raisins
  • ½ cup coconut flakes
Makes 10 bars

Serving Day:
  1. Preheat your oven to 350°F.
  2. Line an 8” x 8” square pan with parchment paper, and grease it with coconut oil.
  3. In a small saucepan over low heat, combine the coconut oil, maple syrup, coconut nectar, sunbutter, and vanilla extract. Stir occasionally just until the ingredients have melted and mixed. Set the mixture aside to cool, about 15 minutes.
  4. In a medium-sized bowl, combine the pumpkin seeds, sunflower seeds (both roasted and raw), sesame seeds, chocolate chips, raisins, and coconut flakes.
  5. Pour this coating mixture over the bar mixture in the saucepan. Stir to combine all the ingredients.
  6. Spoon the bar mixture into the prepared 8” x 8” pan. Place a sheet of wax paper over the top, and press down firmly with your hands to compress and even out the top of the bars. Remove the wax paper.
  7. Bake the bars for 30-35 minutes until bubbly and golden.
  8. Remove from the oven and let cool for 1 hour. Cut into bars.
  9. Let cool completely. Place the bars in an airtight container and refrigerate them to fully firm them up.
  10. Store in the refrigerator for up to a week.
Get the best Paleo Recipe Book with much more recipes for your healthy living.

Paleo Party Mix

Oh, how I used to love the flavor and crunch of Chex party mix! I remember munching on it during family Christmas parties where the bottoms of pants were big, and hair and eyeglasses were even bigger. Yeah, well, thank goodness we’ve outgrown all that! Especially the grains, sugar, and BHT found in that popular cereal.

Nowadays, my hair is a lot flatter, and I use nuts and seeds for that yummy crunch. I think butter or ghee makes the flavor here, but you can use any combo of fats you like, such as beef tallow, coconut oil, or duck fat. Try one of the almonds before placing it in the oven to see if it’s salty enough for your taste. If not, adjust. I like to add chopped cooked bacon at the end for an even better combo. And if you don’t want to use Worcestershire sauce, you can use coconut aminos instead, but cut the salt in half.

Paleo Party Mix

INGREDIENTS
  • 1/3 cup coconut oil, beef tallow, duck fat, or ghee (or a combination)
  • 2 TBSP Worcestershire sauce
  • 1 tsp gluten-free seasoned salt
  • ¼ tsp granulated garlic
  • ¼ tsp granulated onion
  • 1 cup raw almonds
  • 1 cup raw pecans
  • 1 cup raw cashews
  • ½ cup raw pumpkin seeds
  • ½ cup raw sunflower seeds
Makes 4 cups

Serving Day:
  1. Preheat your oven to 275°F.
  2. Line a baking sheet with parchment paper, and set it aside.
  3. In a medium-sized saucepan, melt the coconut oil, fat, or ghee over medium-low heat.
  4. Stir in the Worcestershire sauce, seasoned salt, granulated garlic, and granulated onion.
  5. Add the almonds, pecans, cashews, pumpkin seeds, and sunflower seeds to the saucepan. Mix well until all the nuts are coated.
  6. Spoon the nut mixture onto the lined baking sheet and spread in an even layer.
  7. Bake for 45-60 minutes, stirring every 10-15 minutes, until the nuts are nice and toasted.
  8. Place the baking sheet on a wire rack to let the nuts cool completely. Store the cooled nuts in a sealed container for 7-10 days.
Get the best Paleo Recipe Book with much more recipes for your healthy living.